Gary Samad's Boxster 6-Disc CD Changer Installation Manual
Introduction - Installation Instructions - Dr. Felker Speaks - Radio Removal - Questions, Comments and Clarifications
If you intend to install a Becker 6-disc CD changer in your Boxster, you'll save a lot of money, and, with the following instructions, should have a pretty easy time of it.
You will need the following parts:
In addition, you'll need the following tools:
For more information, see the
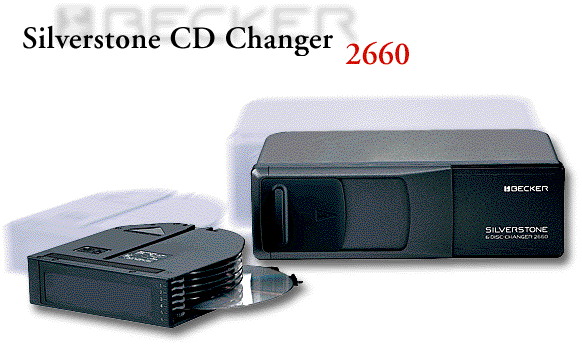
![]() web site. Some highlights at
Becker's web site include:
web site. Some highlights at
Becker's web site include:
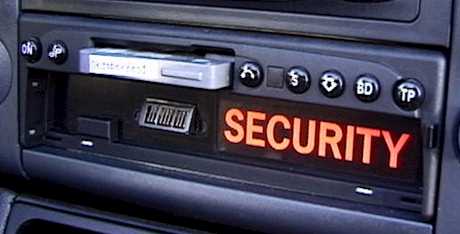
1) Remove the head unit using the removal keys:
2) Feed the cable from the driver's side footwell, behind the console, and out the now exposed slot. Plug the cable into the back of the head unit. Replace the head unit.
3) Remove the spare tire. This is a great time to look at your Porsche's toolkit.
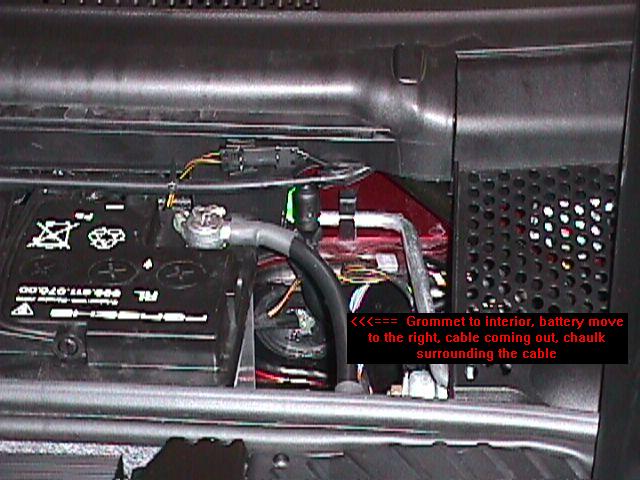
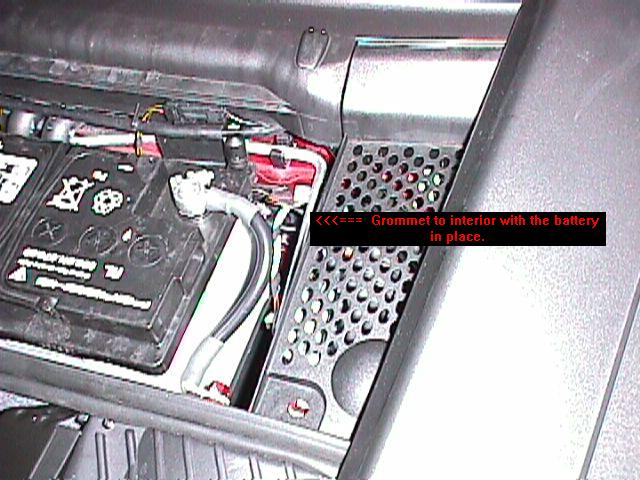
4) Open the battery compartment, remove the nut which secures the battery to the floor and slide the battery to the left.
5) This exposes a round rubber plug in the firewall (facing the driver) that is about two inches in diameter. Don't remove this plug! Cut an X into it by plunging your Exacto knife into it.
6) Have a friend locate the center of this hole by watching the insulation from the driver's footwell while you poke your finger through the hole. Cut a hole in the insulation from inside the car.
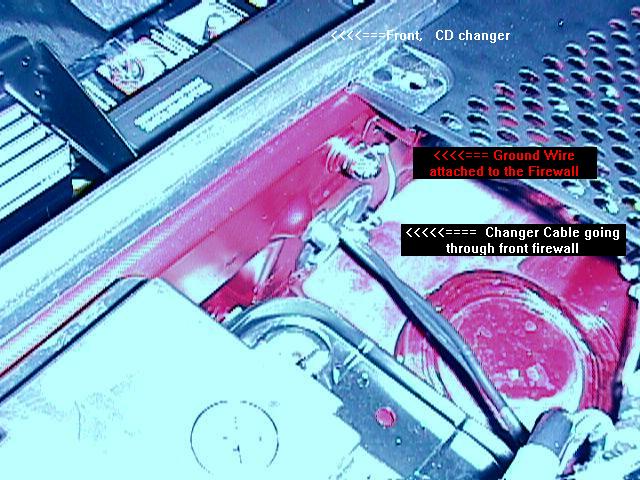
7) Feed the wires through this hole, into the trunk.
8) Locate another rubber plug to the left of the battery leading into the trunk. Using your Exacto knife, slice another X into this plug.
9) In the trunk you will see 4 black plastic covers which fasten the carpet to the frame. Remove the 3 leftmost covers by prying them out with a flathead screwdriver.
10) Feed the wires through the plug and into the trunk:
11) Attach the ground wire provided with the changer to the bolt located just to the left of the rubber plug, inside the battery compartment:
12) If you'd like, you can test the system now. I found that I couldn't disconnect the control wire after connecting it, so it's best to wait until now to try this.
13) Use acetone (nail polish remover) to remove the sticker from the mounting bracket. You'll have to rub a bit, but the acetone won't affect the surface at all.
14) The CD changer will be installed facing the sky, so turn the arrow on the side of the CD changer to point in that direction.
15) Mount the changer to the mounting bracket using the six screws provided by Porsche, but leave the lower screw next to the arrow out for now. You will soon attach the grounding strap to this screw just before you mount the entire assembly into the car.
16) Place the two clips from Porsche into the slots in the trunk floor just behind the spare tire. The base of the mounting bracket will slide down into these clips soon.
17) Insert one of the single black hole covers (that you removed in a previous step) into the rightmost exposed hole in the rear wall.
18) Connect the grounding strap to the sixth screw in the assembly.
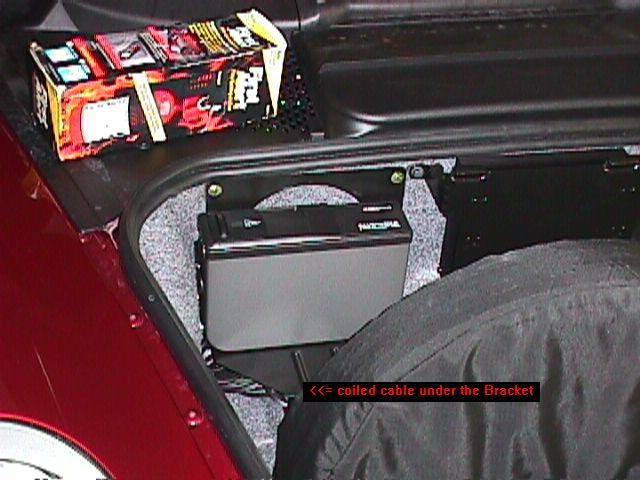
19) Coil the cable and place it as best you can into the well under the bracket location.
20) Mount the bracket by sliding it into the clips in the floor, then screw the bracket into the rear wall using two of the Porsche rubber tube nuts (I don't know what else to call them).
21) You're done! You should have now have quality CD sound!
22) Well, almost done. After testing your system, reinstall the spare tire and slide the battery back into position and tighten down. Now you're really done!
Dr. Felker speaks!
John Felker installed the CD Changer. He shares his helpful insight and images:
1. Be sure to leave enough cable under the dash to allow the radio to be pulled out.
2. Installed, the CD Changer is oriented with magazine facing the passenger side.
3. The bolts used with the "rubber" expanding nuts are sized "M6-1.00 x 16mm" (Remove the bolt holding the passenger side of the amp bracket and take it to the hardware store).
4. There are three plastic round "plugs" holding the liner in place at the installation site (diagram: Oo O). The "O" (bigger in size) fills the holes in the fire wall where the rubber expanding bolts will go. They are not easy to remove. The trick is to drill a hole in the center of the plug (set a drill depth! be careful not to drill too deep!), then place a large screw in the plug and pull! After you've (eventually) pulled them out, throw them away. The "o" (smaller in size) is easily pulled out and pushed back in, since it is a true "push rivet." The two plugs on the passenger side (diagram: Oo) must be loose to allow access for passing the cable.
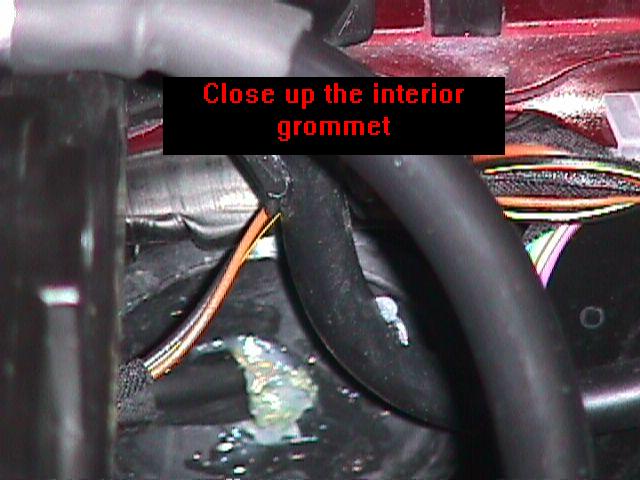
5. Be very careful pushing the cable through the 2" grommets in the fire walls. They are easy to push in, but difficult to pull out. I used hemostats (fancy doctor-style, extra-long, locking needle-nose pliers) to get the passenger-side firewall grommet in the compartment back out.
--If you can, get a pair of straight hemostats from a medical supply (or borrow some from fly-fishing buddy).--
6. After the "X" is cut, the hemostat can be pushed through the insulation and the hole cut on the other side. This is a surgical technique and makes cutting the hole safer. Push the hemostat through, open it up slightly and cut between the two ends.
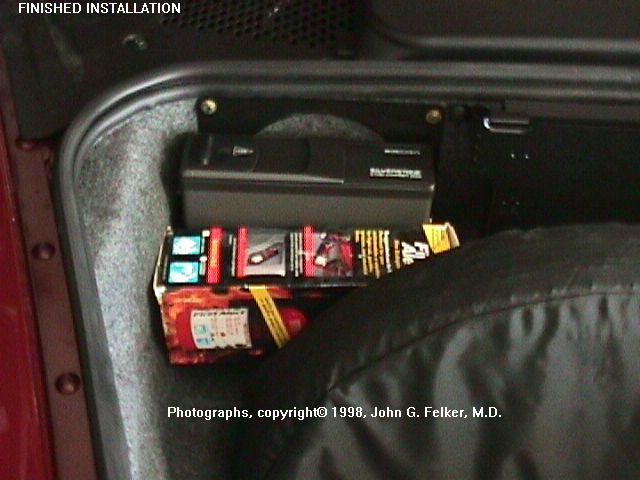
7. The extra cable is coiled under the bracket. I placed a fire extinguisher between the bracket and the spare tire, blocking the sight of all that cable.
8. Test the installation before you tighten everything.
9. Place some clear caulk around the cable where it enters the firewall grommets (to seal them).
Felker says, "I hope this helps! It took me several hours to install the CD Changer. Most of the time was spent figuring out how to get those plastic plugs out! Pliers will not hold them!"
more images: Battery - Firewall
From Dennis Marer: The keys are about 1/4" wide, quite thin, at least 3" long, and shaped like a knife blade. Pushing them in squeezes in tabs on either side of the unit, which unlocks it. What makes them special are the small notches which allow you to pull the unit out using the keys.
If you have some secure way to pull out the unit, all you would need are two thin metal nail files. Or just go to your dealer - mine pulled it out in about 5 minutes, no charge. Also try local Mercedes radio dealers.
doug_d adds: Go to your dealer or call Becker. $1.76 a set plus s+h.
Questions, Comments, and Clarifications:
As complete as these instructions no doubt are, they are written from one man's perspective. It's possible that a few more words of explanation would have helped you install the CD changer more easily. Please send us your comments and additions so that the next do-it-yourself'r will have the benefit of your experience, too. We'll be sure to give you credit.
Send Gary Samad (gary@ensemblecom.com), John Felker (jfelker@prodigy.net), or me (berkeley@industryfigure.com) e-mail if you found these instructions helpful.