
Industry Figure | Berkeley | Back to Jeep Cherokee
Cherokee Rear Bumper & Accessory Installation
My problem? Sorry. One of my problems? Now that the lift is done, I've got bigger tires coming and there's no way the bigger spare will fit inside the Cherokee. If you've got a bigger spare, or if you want to get the tire out of the car to free up space, there are a few ways to mount the tire externally.
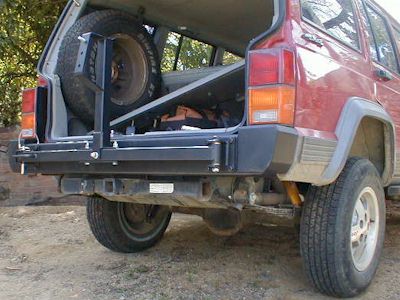
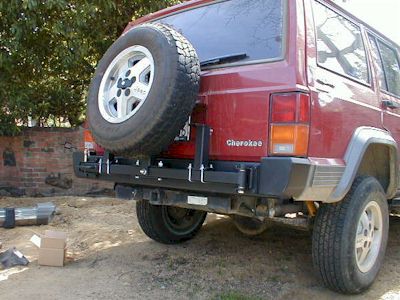
Some people put the spare on the roof, either with a formal mounting system or simply with ropes. Another way is to duplicate the rare tube-frame factory style rear tire carrier which attaches to the body, either with OEM parts or with an after-market system. Because I was so pleased with the Custom 4x4 Fabrication front bumper and rocker guards, I decided to go the third way: adding a trail-tough rear bumper with an integrated tire carrier.
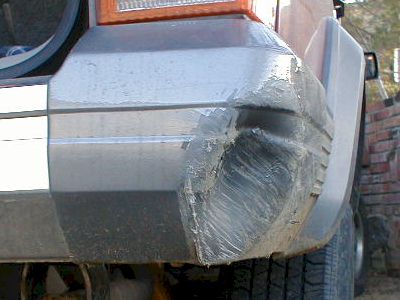
As long as you've got a solid tow point in the rear, a heavy steel bumper isn't really necessary. A lot of Cherokees come with a 2" tow hitch and that's a perfect place to start. Simply slip the tow strap into the opening and insert the hitch pin, making sure it goes through the eye of the strap. You'll find after your first outing, however, that the factory plastic bumper caps will be either scratched, mangled, or totally missing. An easy run on our local Garcia Ridge trail nearly totaled one bumper cap. If you're lucky, the cheap stamped bumper will last a bit longer, but not much. Seriously, the first time it catches a rock edge, it will tear apart.
By the way, you really do need a full-size spare. Don't tempt fate by hitting the trail with a wimpy temporary spare (the trail senses weakness and will crush you like a bug). And when you upgrade to bigger tires, get five.
The Custom 4x4 Fabrication rear bumper, swing-away tire carrier and Hi-Lift mount arrived as expected: on time and well wrapped. Below, I've duplicated the installation instructions in italic and added my own comments, observations, and images.
Installation Instructions for Rear Bumper
This kit includes the following:
A - 1 Rear Bumper
B - 1 Rear Bumper Hardware KitStep 1: Install Rear Bumper using the eight M10 x 1.5 x 30 metric bolts. Adjust bumper so endcaps are nearly touching bottom of taillights and tighten the bolts. Gently close the Jeep hatchback to make sure it clears top of bumper.
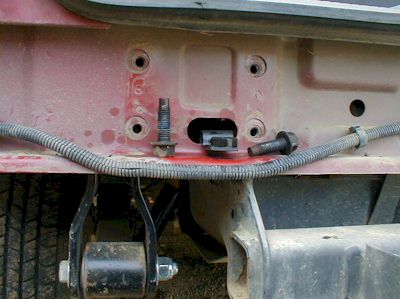
(Speaking of being crushed like a bug...) Look at how easy this is going to be! Only one step! D'oh! They forgot "Step zero," remove the old bumper. No problem, I'll just grab my Sawzall or my cutoff grinder... What? You want to keep the old bumper? That will make it a bit tougher.
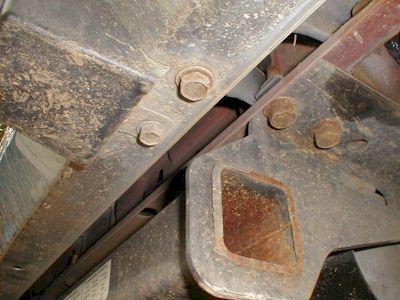
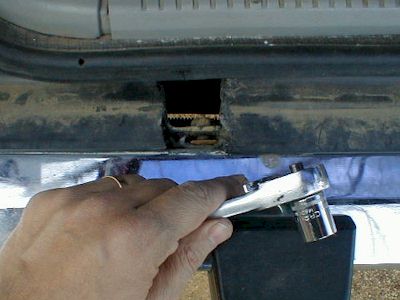
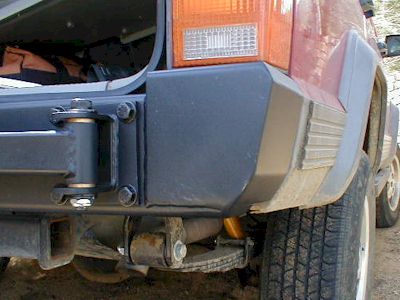
The simple instructions belie the difficulty of the project. The original rear bumper is mounted--two bolts each side--to brackets. The brackets are bolted--four bolts each side--to the body. You can't reach (maybe I don't have the right tools) the four bolts, so you'll remove the bumper from the brackets. The lower bolt is easy (in the image: top center). Now, if you've got a small air socket, you're golden. If not, you might want to consider tearing out a section of the plastic bumper trim in order to gain access to the bolt head. In the image, directly above my index finger knuckle, you can see the bolt through the rent in the trim. The problem is, even though you can get the socket onto the bolt, there's no room to turn the wrench.
Once the bumper is off, remove the brackets. Use plenty of lubricant during disassembly and assembly, or you might have a problem with stripping or cross-threading.
Installation Instructions for Spare Tire Carrier
This kit includes the following:
A - 2 Bumper Support Brackets
B - 1 Latch Bracket
C - 1 Swinging Mechanism
D - 1 Tire Mounting Attachment
E - 1 Rectangular Backing Plate
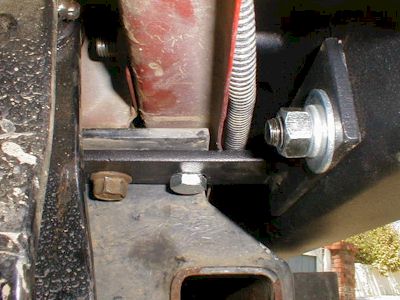
F - 1 Spare Tire Carrier Hardware KitStep 1: Install the Bumper Support Brackets (part A) to the bottom of the unibody using four 1/2" x 13 x 1 1/2" bolts... if you have a trailer hitch use your existing bolts. Use spacers provided as needed to line up hole in bumper support brackets with holes in rear bumper. Do not tighten bolts.
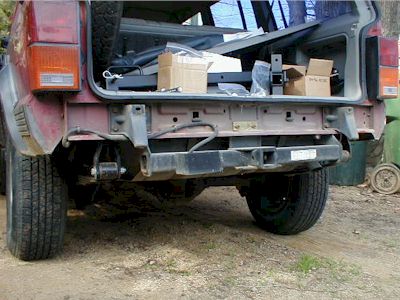
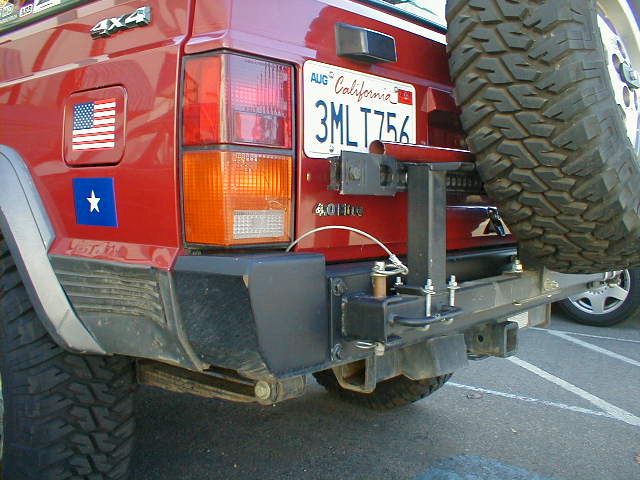
The Bumper Support Bracket and spacer thing threw me. Use the spacers if you don't have a trailer hitch. The thickness of the hitch and the spacers is the same. There is a right and a left side Support Bracket, so test fit them (here's what they look like installed). There's a bit of sheet metal that might hang down in the way of the Support Brackets (you can see it, the thin red line, in the image just to the left of the wire conduit). If so, bend it up or force it out of the way when you tighten the Support Bracket bolts.
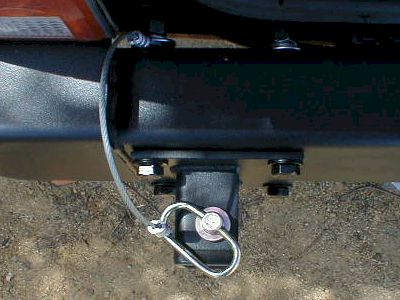
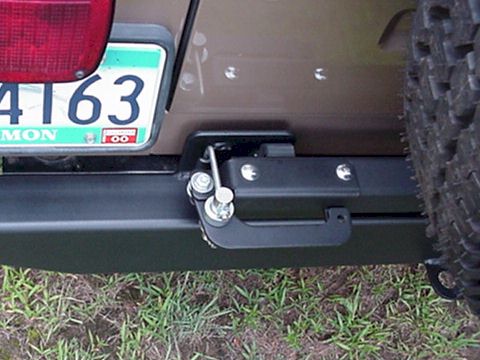
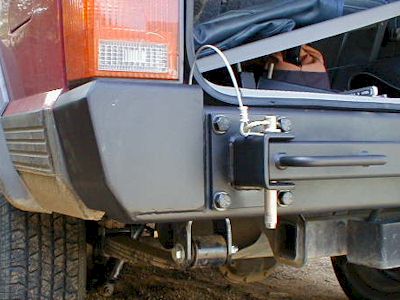
Step 2: Install Latch Bracket (part B) to driver side of rear bumper using four 1/2" x 13 x 4 1/2" bolts... making sure the bottom right bolt also goes through the Bumper Support Bracket. (Attach loop of hitch pin behind bumper in top outer bolt before installing nut.)
Step 3: Install Swinging Mechanism (part C) to passenger side of rear bumper using four 1/2 x 13 x 4 1/2" bolts... making sure the bottom left bolt also goes through the Bumper Support Bracket.
Step 4: Close Tire Carrier and insert hitch pin through the latch bracket. Once all parts are lined up, tighten all bolts.
Step 5: Install Tire Mounting Attachment (part D) to the top of the swinging arm and the Rectangular Backing Plate (part E) to the bottom of the swinging arm using three 1/2" x 13 x 3 1/2" bolts. Tighten bolts.
Mike, owner of Custom 4x4 Fabrication, sent me an image of his new latching system. It uses a permanent latch mechanism instead of the hitch pin and can be locked. The picture shows a TJ, but the same system is used for the XJ bumper.
Installation Instructions for Hi-Lift Mount
This kit includes the following:
A - 2 Hi-Lift Mounts
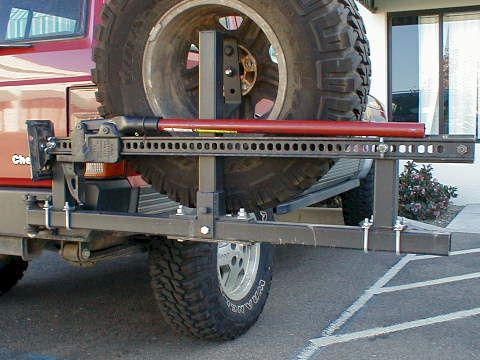
B - Hardware KitStep 1: Begin by opening your spare tire swing arm to the open position. Install the Hi-Lift mounts on either side of the tire carrier upright with the light tabs facing out. (Approx. halfway between the tire upright and each end of the swing arm.) Use two u-bolts per Hi-Lift mount but do not tighten yet.
Step 2: Install your Hi-Lift jack by placing it through the bolts of the Hi-Lift mount with the foot of the jack towards the passenger side with the handle facing up.* Use the flat washers and wing nuts to secure the jack to the mount.
Step 3: Open and close the tire carrier swing arm a couple of times to ensure the jack clears the body of the Jeep and does not prohibit opening. Once properly adjusted, tighten the u-bolts. Do not tighten too tightly.
*Some application may require removing the jack foot to keep it from interfering with the Jeep hatchback. Your jack position may vary depending on your particular application.
The Hi-Lift mount is a nifty, must-have accessory for the rear bumper. The installation is simple, just follow the instructions. It will take a bit of adjusting, though, to get the mounts positioned just right. This image shows the location and orientation of the jack. (I tried every position and this is the only way I could make it fit.) Kick down the release lever, or it interferes with the spare tire. Visit the Custom 4x4 Fabrication web site for some other images of an installed Hi-Lift jack. In addition to holding a jack, the mounts can also carry an antenna, backup lights, or whatever.
On the Trail
How does the Custom 4x4 Fabrication rear bumper perform? I suppose the best thing you can say about a hunk of steel is that I don't really think about it. My gas tank, tail pipe, hitch electrical guard and other exposed sheet metal are all dented, bent and twisted. I'm not worried, though. I know they won't dent any further than my rear bumper. I don't hesitate to drag the bumper on whatever obstacle I've just crawled over. Of course, the bumper's nice powder coating is scratched all over, but there's no real damage. It still looks great, too. I was worried most about the tire carrier. I thought it might vibrate or bounce around, but no; it's solid.
I made one modification. Take a look here at how far down the hitch pin hangs below the latch bracket. I thought the pin might get hung up on a rock and bend, so I added a piece of 1/2" copper water pipe as a bushing above the bracket. The copper pipe simply slips onto the pin before insertion to prevent the pin from dropping too far below the bracket. There's just enough room to insert the cotter pin through the hole in the bottom of the pin. I suppose I could shorten the pin instead and drill a new hole, but I haven't. After the last trip, sure enough, there were some nasty scratches all around the latch bracket. The pin would have bent for sure if it hadn't been shortened. Maybe this trick will help existing bumper owners, but new buyers won't have the same problem; they'll have the new latching mechanism.
The only sad part of this story is that I'm running out of parts to buy from Mike and Kathy. They provide an excellent product for an excellent price, and I don't get paid to say it. If you've got a Cherokee or a new TJ Wrangler, look them up and consider one or more of their products for your rig. And tell them the JeepWire sent you.

