Cherokee CB radio installation
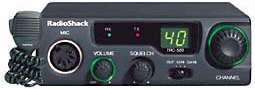
Radio Shack TRC-503 Mini Mobile CB on sale for $39.99.
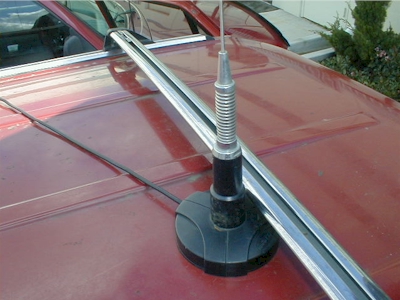
Radio Shack Magnet-Mount CB/Ham Antenna for $29.99.
Why a CB radio? I've been looking for an excuse to buy one since listening to the song Convoy as a boy, but do I really need one? To communicate on the trail, most 4-wheelers use a CB (Citizen's Band) radio. It's used by spotters to help you through a tough spot, by the trail boss to explain the geographic history of a scenic area during a tour, and it's used to keep the group together for safety. There are many other reasons to have a radio, but those few were enough to get me shopping. My objective in purchasing one was to minimize the cost and size. The Radio Shack (please don't laugh) Mini Mobile CB met the need. It's really small, lightweight, and inexpensive. Good enough.
Mounting Location
I temporarily mounted the CB radio here and there inside the Cherokee to test functionality and ease of installation. I tried above the rear view mirror, on the passenger side of the transmission tunnel, and in front of the driver's right knee.
I liked it above the rear view mirror; it was out of the way and the bottom-located speaker pointed toward me. It seemed trucker-like, too... a good thing. There were a couple of negatives to putting the radio here, however. In this high location, the microphone cord hangs in the driver's view. With the microphone disconnected most of the time, this would be a problem only on the trail, but still not ideal. The routing of the power and antenna cables also proved to be a road block for me. It is possible to route these through the headliner and down the A-pillar (the roof pillar between the windshield and the front-most window), but not easy.
From the driver's perspective, mounting the radio on the passenger side of the transmission tunnel was good. Routing power and antenna cables would be easy from there, the microphone cable wouldn't be in the way and the radio would be in easy sight. There's so little room in the cab, though, I couldn't take away from the passenger. On long trips, there always seems to be more than enough junk collecting under foot and I knew the radio would not be a welcome addition.
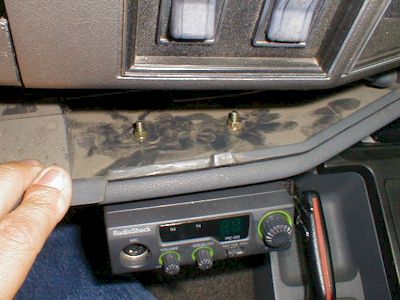
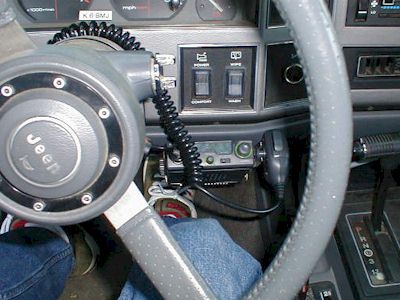
I was hesitant to put the radio in front of my right knee--what seemed to be the most logical and ergonomic location--because I thought it would interfere and be a constant irritant. Not so. The radio doesn't touch my leg and has been never been a bother while street or trail driving. It was easy to install, wire and connect. It's also really easy to access the controls. Using my knee as a rest, I can adjust the radio even on rough roads.
There's a negative to the low radio placement. The speaker points toward the floor and isn't as easy to hear as it would have been in the overhead location. There is no provision for an external speaker, but I can hear it regardless. Perhaps one day I'll figure out a way to route the CB radio output through the stereo system.
Installation
The first step was to make sure there was a suitably strong location on the lower valance of the Cherokee for the mounting bracket. It was also a concern that the radio be mounted low enough to be visually out of the way, but high enough to not interfere with my feet. (The specifics of this installation apply through the 1996 model year. The Cherokee was redesigned for the 1997 through 2001 models.)
Make sure you aren't going to drill into anything important by feeling behind the valance with your hand. If you want to see what's back there, go for it. It's possible to wedge your head far enough into the footwell to get a look behind the lower dash area, but it's not comfortable. Instead, loosen the valance to get a better look behind. The valance extends the entire width of the cab, but it's not necessary to remove the whole thing. Remove the screws on the driver's side and in the center (behind the ashtray), and you'll be able to pull it away enough to see behind it from above.
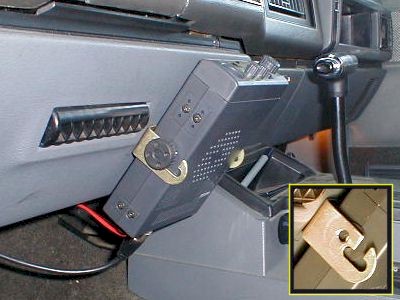
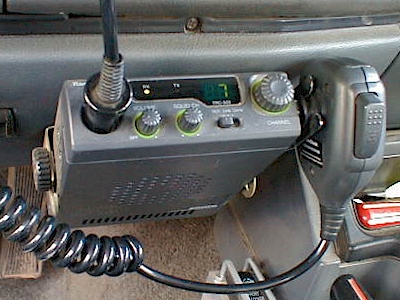
Reinforcing the plastic is a metal strip. Of course, mounting the radio to the metal would be stronger, but it would have moved the radio location too low for my liking. I decided that the plastic would be strong enough to hold the feather-weight CB. I simply drilled a couple of holes and bolted on the bracket.
The quick-mount bracket leaves quite a bit of room wasted above the radio, so I decided to drill new holes (see image detail) in the metal arms. With the new holes, the radio is tight against the dash. Rather than cut them off, I left the original mounting ears in case the installation requirements should ever change. They hang down a bit, but are not in the way.
Power
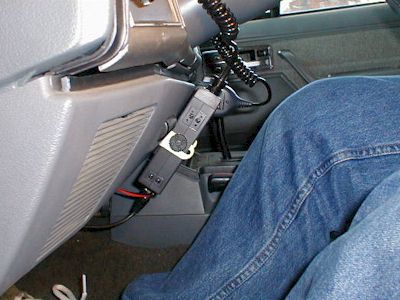
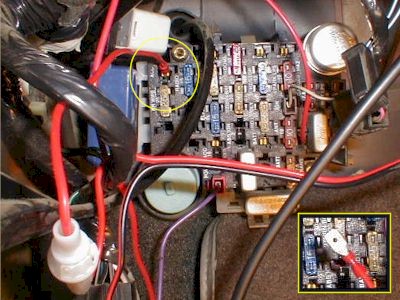
The fuse panel has some empty spots for both switched and unswitched power. I chose to use a switched connection to help prevent accidental battery drain. It's easy enough to connect the hot (red) lead. I crimped on a spade connector and plugged it in. You can see the plug location in the image, circled in yellow in the upper left corner. The CB power wire is red and has a white fuse holder connected to it (lower left corner of the image). If I ever need to use the CB while the ignition is off, I can just change the connection to an unswitched slot.
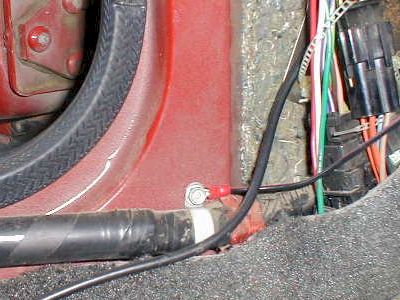
Lastly, the ground wire needs to be connected to the body somehow and there are any number of places to do so. I removed the plastic body panel near the parking brake and found a suitable screw. I attached the ground (black) wire to the screw with a round crimp connector.
Antenna Tuning
Antenna design and theory is an art and I won't pretend to know anything more than this: tune your antenna. If you don't want to buy a tuner (this may be the only time you use it), contact your local 4x4 club and ask if any member has a tuner. The Radio Shack antenna I purchased is a dual purpose antenna and has to be adjusted for maximum performance. In fact, an improperly tuned antenna can damage your radio.
You or your benefactor will adjust the antenna length to provide the best Standing Wave Ratio, or SWR. An impossibly perfect reading is 1.0, meaning that 100% of the power is being projected out from the antenna. Higher SWR numbers mean that some (or a lot of) radio power is being reflected back, either wasted as meaningless radio emissions or as radio-damaging power. My inexpensive, but well designed, antenna tuned to a very good 1.2. Most clubs use either channel 4 or channel 16 (4x4=16... tricky, eh?), so you could tune for maximum performance at one of those channels instead of the recommended middle-of-the-band channel 20.
Performance
As a licensed Amateur Radio operator, I can't believe that CB radio performance is so poor, though there are things that can be done to help make it better. Again, antenna tuning is the first and best way to improve radio performance. Tuning, in addition to the above reasons, it will also expose gross installation problems: a bad cable, a bad antenna, or a bad antenna location. Bryan noticed on the trail that--though others could--he couldn't hear those furthest away, especially the trail-leader. The tuner confirmed he had problems (a bad cable and a bad mounting location). His fiberglass antenna was mounted to his YJ's rear tire carrier, and after a number of frustrating attempts to improve performance, a new mag-mount antenna/cable assembly fixed his problems.
My system works as well as can be expected, mostly due to a well designed, low SWR antenna and the antenna's location on top of my XJ roof. The roof provides an excellent ground plane to help transmission and reception. (A ground plane is a flat reflective surface, like steel or water, that helps improve the performance of some designs of antennas. On Project BrYJ, the best performance was realized by placing the antenna in the center of the hood. Like every CJ/YJ/TJ I've seen, he's got a soft top or a fiberglass hard top... no ground plane there. The hood's flat metal surface improved reception distance from a few hundred yards to a couple of miles.
Buy a cheap radio and an excellent antenna. Install them properly and you'll be able to communicate successfully with your friends on the trail.